


Blogger Getting Started Guide
To start using Blogger, simply sign in
with your Google Account. (If you use Gmail, Google Groups, or orkut,
you already have an account.) If you don't have a Google Account yet,
you can create one now.
Contents
Create a blog
To start a blog with Blogger, visit the Blogger homepage, enter your username and password, and click Sign in. Enter a display name and accept Blogger's Terms of Service. Then click the Create a Blog link and get started!Pick an address (URL) and a blog title. Then, choose your favorite blog template (this is how your blog will look when you publish it). Now get creative, add information to your personal profile, and customize how your blog looks, if you feel up to it. Start blogging now!
Back to top
Dashboard
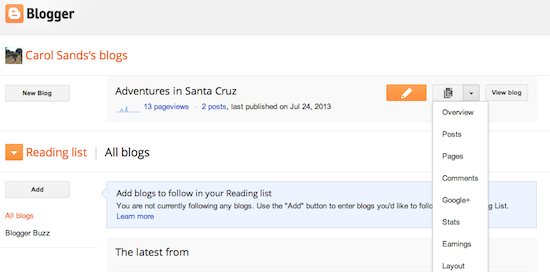
Your Dashboard, as always, is your starting point. This is where all your blogs are listed, and you can click on the icons next to them to perform various actions on each blog, such as:
- Writing a new post: Just click on the orange Pencil icon on your Dashboard to access the Post Editor.
- Viewing your posts: The gray Post List icon will take you to a list of your published and drafted posts for a specific blog.
- Catching up on your favorite blogs: Below the list of your own blogs, you’ll see a list of the blogs you follow with an excerpt from their latest posts.
- Everything else: Check out the drop-down menu next to the Post List icon for a quick link to:
- Overview
- Posts
- Pages
- Comments
- Stats
- Earnings
- Layout
- Template
- Settings
Back to top
Overview
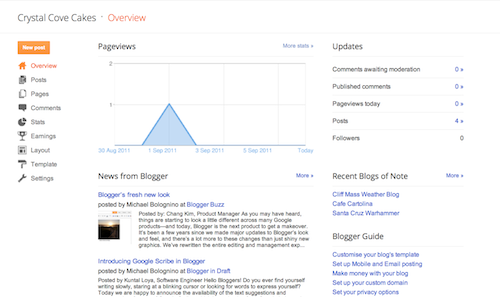
On the Overview tab, you can see your blog’s activity, news and tips from the Blogger team, and recent Blogs of Note.
Back to top
Once you've signed in to Blogger, you'll see your dashboard with your list of blogs. Here's what you need to do:
- Click the orange pencil icon to write a new post, and enter anything you want to share with the world.
-
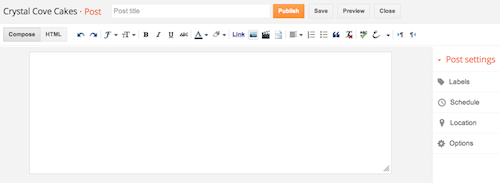
Next, you'll see the Post Editor page. Start by giving your post a title (optional), then enter the post itself:
-
When you're done, click the Preview button at the top to make sure it's ready to go, and then click the Publish button to publish your post.
Add an image
You can add an image from your computer or the Web to your blog. Click the image icon in the Post Editor toolbar. A window appears prompting you to browse for an image file on your computer, or enter the URL of an image on the Web.Once you've selected your image, you can then choose a layout to determine how your image will appear in your post:
- The 'Left', 'Center', and 'Right' options allow you to customize the way your blog text will flow around your image.
- The 'Image size' options will determine how large the image will appear within your post.
You can also publish images to your blog using your mobile device, Google's free photo software Picasa, or a third-party service like flickr.
